Saturday, July 30, 2011

Still Here!

I've noticed that while the Caffeinated Mommy had added all these wonderful tutorials and made several posts in the past few weeks, I've um...made none. Oh whoops... But as the Caffeinated Mommy and I have joked about on many occasions, knitting takes a lot longer than sewing. ;-) While she can crank something out in a couple of hours while her boys are napping, I'm amazed if I can finish I project in two or three days.

Lately, I've been feeling a bit under the weather, and DH has been super busy with work, traveling for more than half of the month, so I've been knitting, but I haven't had the extra time to write anything about it.

I finished a couple of projects for the Glee Cast Knitting Project that a wonderful group of Gleek knitters and crocheters put together. We made hand knit items for every member of the cast, and we're hoping that these lovingly made items will be worn by the actors on the show. It'd be pretty cool to see something I made on TV.

So here were my contributions:


Two hats for Finn (Cory Monteith). It was rather difficult to find a pattern for a character whose wardrobe is pretty much confined to jeans, striped polos or a football uniform.

Then, at the last minute, I made this cowl for Mercedes (Amber Riley). I love how it turned out, and I'll definitely be making another one for myself. :-)
For more information on the yarns and patterns I used for these items, visit my other blog: Somewhere Between the Stitches.

I also finished some other projects recently, and I don't think I've shared them here...

A dinosaur hat, made for a friend's little one who recently turned one:
The Stereostyle hat, which I also made for the same little man as the Dino Hat, but this is an improvised pattern, so I'm working on writing up both a knit and crochet pattern for the headphones. Will share them soon!
The hat itself is knit, but the headphones are crocheted on this version. I've made up another one with knit headphones, but I haven't got a photo of that one just yet.

I'm also still plugging along on the Ratchet and Clank hats, although from time to time, I need a break from those hats. Since I'm writing a pattern for those as I go along, it requires a bit too much thinking for my knitting tastes and there's only so much of it I can take at a time. ;-) So far, Clank is complete, and version 2 of Ratchet is in the works. Hopefully, I'll be able to share those patterns soon!

Thursday, July 28, 2011

Bandana Dress

There will be no tutorial for this quick entry, but I just had to share my newest creation:
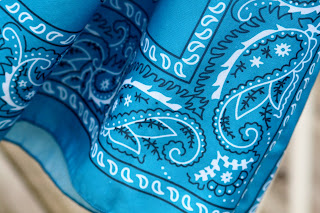
A "PILLOWCASE" DRESS MADE FROM BANDANAS!!

 I'm totally not a dress kinda gal (my 3 1/2 year old calls any woman wearing a dress a "princess" because he sees dresses so rarely!  ha!)
But seriously.  How freaking cute is this??!!!  And of course I have no female little people in my life to model it for me, so the deck chair will have to do. 
:)


Tuesday, July 19, 2011

When you make tall,skinny babies....

...there is often some 'ghetto booty' going on in your house.
G - circa Oct. 2009 (18 months)
{sorry for the crappy cell phone photo}

H - 13 months...circa EVERY day

(Not only do my children both have issues with droopy britches, they apparently like to run away from me with said droopy britches!!)
And, since the MIL is in town and sleeping in my sewing room, there is little crafting going on in my home right now.  However, I always enjoy a 'quick fix', and, although it's probably a stretch to say this is a "craft", it does involve fabric and snaps.  And a hammer.  I'm going to say that qualifies it.  ;)

As stated in the title, I (somehow!!!) make tall, skinny babies.  Well, the tall part isn't unbelievable...I'm 5'10" and the hubs is 6'2".  The skinny part?  Yeah.  I don't get that one either. 

Anyhoo...it never fails that the boys need clothes to fit the length, and while I am able to find most pants with the adjustable waist band (some brilliant woman made millions on this idea!!), pjs are another story.  I love the cotton, t-shirt material, 2-piece deals for my guys, especially in the summer.  And who can pass up $3 pjs (when they're on sale) at Walmart??!

Enter the hammer. 
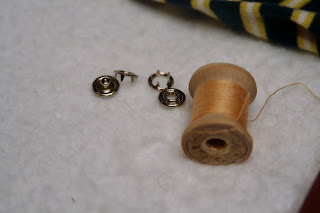
And snaps.
And for those of us who are too cheap to buy one of the nifty snap affixing tool thingies (technical term), you can use a wooden block, or an 864 year old wooden spool handed down by your mother.
With the pants on the child, I pull the fabric together in the back until they're snug enough to stay up.  I usually use a safety pin (or just keep them pinched between my fingers, pick up the child with the other hand, and remove the pants altogether) to judge how much fabric needs to be taken in.  (Sorry, no picture for this step.  I'm not quite talented enough to hold a 20 pound wriggly child, the pants, AND the camera.  Sorry.  I'll work on my awesomeness skills.)


Using the rear seam as a guide, I keep that as my center, and adjust my pinning/holding/marking accordingly.


Attach the snaps on either side of your center seam with the "top" of the snap on the inside of the waistband.  By doing this, the 'male' end of the snap will be pointing away from baby when unsnapped and you'll never have to worry about it coming unsnapped (or leaving it unsnapped) while baby is sleeping or when baby fills out enough not to need the snap.


Then just fold the back of the pants together (extra fabric will be against baby's back)...
...and SNAP!


Insert baby, and you're done!

The best part of this quick fix, is that if you attach the snap in the waistband, once baby grows you can either just leave it unsnapped or remove the snap altogether, and there will be very little evidence of it ever having been there.


I'm linking to:
Tip Junkie handmade projects

Monday, July 18, 2011

Small Bib Tutorial

I had made a few 4th of July/patriotic bibs & burp cloths to sell on my etsy site (www.thecaffeinatedmommy.etsy.com - shameless plug!).  Unfortunately, they did not sell well, so I outfitted my little cutie appropriately for the 4th with one:


Wow...has he changed from July 4, 2010!

2 weeks old 
(WHERE has the time gone??!)

Oh, sorry.  Anyway, I had a couple done, and a couple more in the process of being completed (you know, just in case they were all snatched up really quickly.  Ahem.  So, since they were setting here in all their unfinished glory, I figured this would be the perfect opportunity for my first tutorial.

I will apologize in advance for the quality of these pictures.  My guest/sewing/craft/storage room has a pitiful amount of natural light and the overhead light isn't much better.  {I won't mention I took most of these pictures after the boys were in bed tonight, so natural light really wasn't an option.}  =)

Materials
* 9x12" piece of cotton fabric (for the front)
* 9x12" piece of chenille (or terrycloth, or whatever material you want for the back)
* thread
* straight pins or quilters pins
* pen/marker/pencil/something to trace your pattern with (it will be on the inside of the finished bib, so a washable writing device isn't necessarily necessary.) Say that 3 times fast.
* sewing machine

Step 1: Place your cotton fabric (which will become the front of your bib) face down and trace your pattern onto the back of it. *Note: I'm in the process of trying to figure out how to make a bib pattern you can print out here...hopefully soon.  Until then, just enjoy the tutorial (ha!) or trace a bib you have laying around the house.*

Step 2: Cut out the front of the bib.
Step 3: Lay the bib front right side down on top of your chenille (or backing material) which is right side up.  (The 2 right sides of material are now together.)
Step 4: Iron these 2 pieces of material, and then pin the 2 pieces together in several locations around the bib.
Step 5: Starting at the bottom left corner of your bib (as it lays in front of you), sew around the bib's outline, stopping after you make the last turn on the bottom right corner of your bib (as it lays in front of you).  Now you should have the 2 pieces of material completely sewn together, minus the bottom of the bib.
Step 6: Cut out your bib, leaving about 1/4" from where you already sewed.  DO NOT get too close to your thread...it's a real pain to go back and restitch.  Especially after you turn it right-side out.  Leave a little extra material at the bottom opening.  This will make tucking the raw edges and top stitching easier.
Now you should have what looks just like a baby bib.  Only inside out.  Make a few small cuts at the neck so it will lay smoother once you've turned it right-side out.  Get close to your thread...just not too close!
Using the opening you left along the bottom, start turning the bib right-side out.  Using the eraser end of a pencil, a wooden dowel, or an unopened pen, gently force the whole thing right-side out.  Make sure you run your tool along the insides along all seams to make sure they're all laying nicely.
Now, press your right-side-out bib.
Using the extra material you left at the opening, fold the front and back pieces into themselves.
Keep working your folds until the bottom of the bib lays nicely.  Ironing again at this step helps it lay flat, but isn't necessary.  Pin the opening closed.

Oops.  I forgot to keep numbering my steps. 

Okay, um....Step 13-ish: Now you're going to top-stitch around your entire bib.  You can use whatever seam allowance you like here...I personally use about 1/4".  Start at the bottom right corner (as the bib is laying in front of you) and sew the opening closed first, and then continue around the bib.  Make sure to backstitch when you come around to where you started.
14ish.  Now your bib is basically complete. 
Now you need to add your fastener of choice.  For this bib I'm using velcro, but a snap works just as well.  Totally a personal preference.

Cut about a 1" piece of velcro and find the location you want it.
I find it easier not to pin the velcro since I use such a small piece, but you certainly could if you don't feel like you can hold it in place well enough while you sew.  Now, my technique is probably different than some, but I prefer to sew each side of my velcro rectangle multiple times before moving on to the next side.  Basically, I start at the top right corner and sew straight down to the bottom right corner.  Then, I backstitch the whole side - up to the top right corner...and then back down. Now, the right side has 3 rows of stitching (all on top of the others) while the other 3 sides have no stitching.  Make sense?
Then do the same for each of the other 3 sides.  (In the above picture, I've done the first 3 sides, and have just started on the 4th).  At each corner, leave your needle down, lift your foot, and pivot the bib before starting the next side.

Match up where you want the other piece of velcro on the inside (chenille side) of the piece which will go around baby's neck and repeat the process.
When you're all done, it should look like this:

And voila!  You have a patriotic (or fabric of your choice!) bib for baby!


My little model proved why I tend to prefer snap closures.  =)

I'm linking up to Tip Junkie's Tip Me Tuesday:
Tip Junkie handmade projects